
Colors play an immensely important role in mobile app interfaces. As most seasoned iOS developers know, one of the first things you'll do when building the user interface of your application is coming up with a list of universal, re-usable list of colors. These colors will often have discrete roles in your application, with different colors chosen to communicate a specific meaning to your users.
Because the color choices themselves often come from a designer, developers will often find themselves looking at a list of values, that typically come in with four components: red, green. blue, and alpha. A color from a designer might look like this:
#008EB8
If we look at this value at color-hex.com, we can see that the designer is looking for you to use a blue swatch that looks this:

color-hex.com's representation of #008EB8
So far, all of this should be pretty obvious to you. The hexadecimal value of the color contains the red, green, and blue components in base-16, with the pairs of two characters referring to each component's value from 0-255 in the standard RGB order. Since the alpha component (opacity) isn't supplied, it's assumed to be 255. This common format which you've interacted with countless times before is known as #RRGGBB format. For this color, the alpha value is 255, the red value is 0, the green value is 142, and the blue value is 184.
So now that you've got a color, how do you use it in Xcode? A common strategy is to create an Objective-C category, where each of your colors is added as a class method to the UIColor class. It might look something like this:
UIColor+ProjectColors.h:
UIColor+ProjectColors.m:
Once these files have been created and added to your project, you can refer to your custom colors the same way you'd refer to any of UIColor's factory options. It's a handy way do things, and is probably the most used approach on iOS. In fact, many tools used in the design-code pipeline can create these files fore you, including InVision, Zeplin, and PaintCode.
But what about Interface Builder? Savvy iOS developers know that parts of your UI can and often should be created in Interface Builder. A good iOS developer will know how to create an interface both during runtime with Objective-C / Swift, as well as how to create that same UI in Interface Builder. Choosing between the two options and splitting up the work should be done based on the needs of your application, not because one approach is easier or harder. Interface Builder files work together with the Objective-C runtime, and sometimes it makes sense to specify colors in IB, especially for static interfaces or re-usable components.
Picking a color in Interface Builder is the same as picking a color in pretty much any macOS cocoa application that uses NSColorPanel. Apple provides you with a UI that allows you to choose your color from an available list, or else specify specific values directly via your keyboard or the dropper tool. So why is it that so many developers choose to never add colors in IB, instead creating a color-less interface and adding all the color choices in code? It probably has something to do with this:
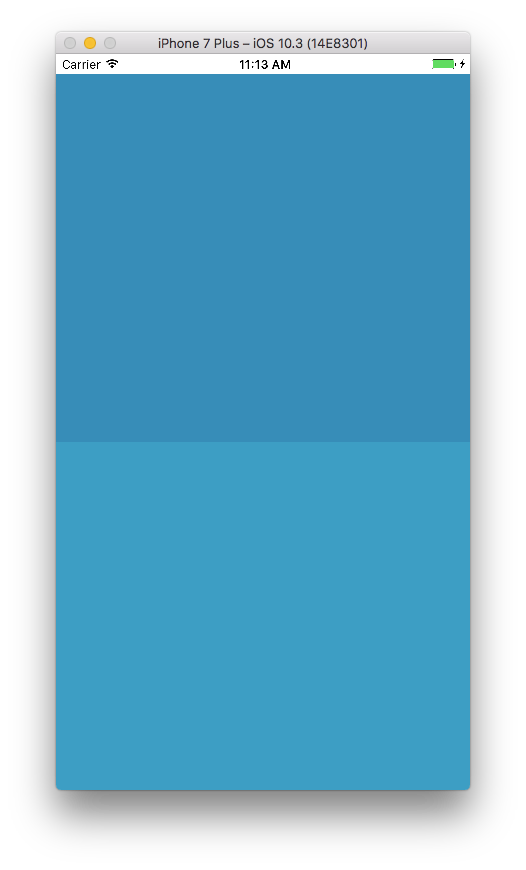
Programmatically specified color (top), vs IB specified color (bottom)
In the application above, I've created two UIViews. Both views are created in Interface Builder, with weak property references to each one in the View Controller's class called "topView" and "bottomView" respectively. The top one has it's color assigned during the view controller's -viewDidLoad method, using "self.topView.backgroundColor = [UIColor coolBlueColor]" The bottom one had it's color specified using interface builder's color picker:

Color Panel from Xcode 8.x, an instance of NSColorPanel
What gives? Why are the colors different even though their values are specified identically? Why does behavior happen only sometimes but not always? And which color is the one that the designer actually wanted you to use? We all know how angry designers can be when your interface doesn't match it's original design with pixel-perfect accuracy.
To understand why this is happening, you need to understand how UIColor, (and it's AppKit counterpart, NSColor) stores color values under the hood, and how changes in recent versions of the iOS/macOS SDK and Apple's own hardware make these variations more common than ever before.
The RGB color model is device dependent
A "color model" is an abstract term representing a system used to identify and define a single color. Color models define a set of parameters, (usually single color components), whose unique combinations are meant to reference a single, discrete color. There are many color models, but the one that software engineers most commonly use, and the one you're probably already familiar with, is the RGB color model, which is handy because it's a direct reference to the hardware of the display in question (which actually has red, green, and blue color channels for every pixel). While the RGB color model is a handy one for use in software, it's not without fault. Color component values in RGB do not explicitly refer to a single color: #008EB8 can actually refer to thousands of potential colors, all of which can look similar to each other, but are not exactly the same. This is because the red, green, and blue component values are describing percentages relative to the hardware that the color is being displayed on. The RGB color model is device dependent, because different manufacturers use different shades of red, green and blue, and the manufacturing process can result in different maximums due to variations in dye choices, phosphorus usage, lighting components, and more. Here's the rub though: when your designer gives you #008EB8, they are almost certainly referring to a single version of #008EB8. You need to make sure that you're using the same version of #008EB8 everywhere in your app to create a consistent experience and avoid confusing your user, and it's probably best that you use the version that your designer requested.
Color Spaces
In order to ensure that colors look the same across all devices, colors in RGB should also provide you with a color space. Think of a color space as "standardization" for a device-depedent color model (like the RGB color model). They define transformation values and a specify a list of exact colors for every possible RGB combination. In iOS instance of UIColor contains values for each color component, as well as a color space for which those components are designed for. When the color has to be displayed, the computer looks at the provided values & color space and translates these values into their device dependent counterparts, ensuring that the color looks the same regardless of device its being looked at. Every display has its own specific color spaces that may support a wider gamut of colors than the one your designer intended you to use. Providing a color space explicitly is the only way to guarantee that your colors will match the design and look the same everywhere in your app. no matter how they were drawn.
Device Dependent Color Spaces
Device dependent color spaces use floating multipliers, rather than explicit ones. They are typically used to describe the color gamut of a single display, and are a bad choice when specifying colors in software.
sRGB Color Space
The sRGB color space was created in 1996 by HP and Microsoft, and is the most common RGB model color space in use today. It is the de-facto color space for HTML and CSS, and if your designer hasn't provided you with a color space, it's a pretty good bet that this is the one they want you to use.
Adobe RGB 1998 Color Space
The RGB color model is an ideal one for engineers, but it isn't so great for print media. See, while computers are limited to interpreting color based on three discrete channels, printers have no such limitations. They can have as many cartridges as the hardware will allow, and were initially responsible for representing a much wider gamut of colors than computer displays were capable of in the 90s. As such, many people already had their colors specified using the CMYK color model, more commonly used for print.
Adobe, whose products were widely used by artists and designers wanted to create an easy way to represent colors using the simple, three component system of sRGB, but also be able to display the larger number of colors available in various CMYK color spaces. So, in 1998, they created the Adobe RGB color space.
The Adobe RGB color space isn't used very much in software as print media has changed dramatically since the 90s, but you might find that older designers and people more accustomed to Adobe products like InDesign will still provide you with RGB component values in terms of Adobe RGB 1998.
Display P3 Color Space
The Display P3 color space was created in the early 2010s by film makers who wanted to express a wider gamut of color thanks advancements in modern photo / video recording equipment. The Display P3 color space supports a much wider color gamut than sRGB, but is also incompatible with sRGB, meaning that values in sRGB represent a *different* color on Display P3. Most computer displays available today can't even display the full color gamut of Display P3, but it is possible that in the future, Display P3 could replace sRGB as the de-facto standard. Apple is certainly pushing for it, as the latest iPhones and iMacs can display full P3, and they've baked easy DP3 support deep into both UIKit and AppKit's color API.
Extended Color Spaces
As displays have gotten more powerful and complex, the sRGB color space has started to show its age. Most modern displays can show even more colors at the bleeding edge than sRGB was ever designed for, but creating a new color space (Like Display P3) could break compatibility with older code. To solve this problem, the Extended sRGB color space was created. The EsRGB color space supports a wider color gamut than the original sRGB color space, but maintains backwards compatibility by allowing values greater than 255 for each component. As a result, values designed for the sRGB color space will look the same in the EsRGB color space, even though the EsRGB color space supports a wider color gamut with more possible color combinations. The serves as a bridge between the limitations of sRGB and the wide gamut of Display P3, and will probably be the one you use most at the time of this writing.
UIColor's Behavior with RGB Model Factory Methods
Before iOS 10
With earlier versions of iOS, UIColor created colors in an iPhone specific, device-dependent color space, designed to be similar if not identical to the sRGB color space. The RGB model factory method most commonly used, +colorWithRed:green:blue:alpha: would take in CGFloat values from 0.0-1.0, and create a color that would be almost imperceptibly different from their counterparts in the sRGB color space with the same component values. If you provided values over 1.0, they would be automatically "clipped" at 1.0 per the limitations of sRGB.
After iOS 10
Projects linked with the iOS 10 SDK have new behavior for UIColor. the +colorWithRed:green:blue:alpha: factory method creates a color in the extended sRGB color space -- no longer an approximation. Because this color space is extended, values over 1.0 are accepted. If you previously relied on the behavior of clipping values over 1.0, iOS 10 won't do that for you anymore.
Under the hood
UIColor always stores your color in a single color space, and the color space in question depends on what release of the SDK you're using. Even if you use non RGB-model based constructors, or RGB constructors that explicitly name a different color space, like +colorWithDisplayP3Red:green:blue:alpha:, UIColor would convert those value's into the color space it uses under the hood and store the converted values instead. In the example below, I created a color using P3 values, but I could only retrieve their Extended sRGB counterparts (I'm using the iOS 10 SDK)
Code:
Debugger Response:
NSColor's Behavior with RGB Model Factory Methods
AppKit's UIColor counterpart, NSColor, has a bit more flexibility. Unlike UIColor, NSColor stores both color component values, as well as a reference to a color space to which the values are designed to be used in. NSColor's RGB model factory methods always specify a color space explicitly. You can use factory methods like colorWithSRGBRed:green:blue:alpha:, which explicitly names the color space in the method's title, or methods like colorWithColorSpace:components:count:, which take in both a set of color components as well as an NSColorSpace object, which you can create with that class' own factory methods that exist for commonly used color spaces, as well as create your own, totally customized and use-case specific color space. Take a look at the documentation for NSColor and NSColorSpace for more info on how to truly customize these powerful classes.
When you retrieve color components from an instance of NSColor, you get the values in terms of the color space it is also referencing. You can convert NSColor objects to other color spaces to get the component values in the space you want, and you can convert from spaces that use entirely different, non RGB color models as well. When attempting to retrieve values from an NSColor object, remember to check it's color space, and convert the object the the one you're looking for if needed.
Color Spaces in the Xcode Color Picker
Here's where most people run into trouble. By default, Xcode's color picker does not explicitly specify a device-independent color space, but rather uses generic RGB values instead. When you're picking a color in the Xcode color picker, you must ALSO provide a color space, otherwise generic RGB values will be used to formulate the color in a non-standard color space. To change the default color space behavior, click in the gear icon and choose a color space from the available list.

Choosing a specific color space in the Xcode Color Picker.
Choose your color space before entering in your values
Notice that Xcode doesn't readily show you the selected color space. It's off in a side menu, because the Xcode color picker treats the color space like a viewing preference rather than component of the color. This can be annoying because, not only is it not obvious what color space is currently selected, but also because changing the color space transforms your RGB values to keep your selected color the same. This can be useful for translating single colors across color spaces, but probably isn't the behavior that a developer would expect. The color panel is the same one used across macOS though, so it makes sense for the picker's uses in other more design-centric applications. Take a look at the pickers below that show #008EB8 first without specifying a color space, then again after explicitly requiring sRGB, then again after re-entering the #008EB8 in sRGB.
Notice that, while the first and third colors have the same values, they produce a different color. The first and second colors produce an identical swatch, but have different color component values. The third color is probably the one your designer wants you to use. It matches both the UIColor instance we created earlier in this post, as well as the swatch found on hex-colors.com
As such, remember to check your color spaces before entering your color values into the color picker. If not, you'll need to enter in your color values *twice*, and you might forget to do it entirely and end up with inconsistent colors in your app.
Color Lists in Xcode
Because entering colors in the color picker can be time consuming (if not that difficult), Xcode allows you to save groups of colors into a list. If you go to the third tab in color picker, you'll see a drop down menu that allows you to choose from the available color lists.
Colors available in a list named "Apple"
Apple provides you with a few handy color lists, but you can create your own too! You can even import a color list created by a designer or a fellow engineer to ensure that everyone is working with the exact same colors.
To create a color list in Xcode, click on the "gear" icon at the top, and choose the "new". From here, you can name your color list, and add as many colors as you'd like using the dropper tool. Color lists are stored as .clr files, and are available for you to copy/distribute in ~/Library/Colors/.
Note that color list files are read when the first shared NSColorPanel instance is created in an app, so you'll need to relaunch Xcode or any other app before changes to this directory will become available.
Creating Color Lists Programmatically
Creating color lists in Xcode is certainly convenient, but it can also be time consuming and inflexible. You don't have NSColor's full implementation to access exactly what color you need, and it can be difficult to select all your colors using the dropper tool. Thankfully, Apple has also provided us with NSColorList, a handy API that allows you to use a list of NSColor objects, bind them to names (keys), and spit out a .clr file for re-use & organization-wide distribution. NSColorList's -writeToFile: method can even install the file in the appropriate directory on your machine, or a specified path if you prefer. I won't go into too much detail in how to do this, but take a peek at the NSColorList documentation if you're feeling fancy.
A step-by-step process
So now that you know all this, let's come up with a step-by-step process for handling colors in iOS.
1.) Obtain a list of colors from your designer or create one yourself.
Most designers will provide you with a style guide, or give you a list of colors available via the ever growing list of dev-design tools like Zeplin, InVision, or PaintCode. If you're really unlucky, they'll give Sketch files, Adobe Illustrator files, or (*gasp*) Adobe Photoshop files. Go through whatever assets you have at your disposal and come up with your list of named, re-usable colors and their RGBA values.
2.) Determine the color space to use and translate values if needed.
Talk to your designer to find out what color space their values are designer for. If you've only got a list of colors and no samples, you'll have to talk to your designer. If you're designer isn't sure, it's pretty safe to assume that they're talking about the sRGB color space. If you've got samples or assets to work with, you don't even need to talk to the designer. You can use Apple's Digital Color Meter app, available in /Applications/Utilities/. This handy little thing lets you mouse over any pixel on your display and will show you the color's RGB values using the color space of your choosing. Using this tool, you can figure out if the values in the meter match the values provided by your designer.
3.) Create some re-usable code for your list of colors
There are multiple strategies for doing this, but you'll want to make sure that you can easily access any color you need from any UIView or UIViewController subclass you might be working on. Creating a category for UIColor is a popular option.
4) Create a Color List for use with the Xcode Color Picker.
Enter your colors into Xcode and save each one to a custom color list. Do this in a slow, deliberate manner, ensuring that your values and color space choices are correct. If you have assets available to you, you can use the dropper tool to ensure accuracy.
With these steps, you can ensure that your colors always look the same, whether they were assigned to a view in Interface Builder or in code, and that your colors always look exactly as the designer intended!
Color Pickers in Popular Design Toools
- The popular design tool Sketch from Bohemian Coding does not use Apple's standard color picker. If you need to work with Sketch for any reason, know that you are always specifying color values in sRGB (At least as of this writing, Sketch 45.1).
- Photoshop and Illustrator have their own color profile management systems and can even export files containing those settings. This system can be enabled or disabled as necessary, and you should take care to figure out what color profile is currently in place. Like Sketch, Adobe products also use their own color picker, but unlike sketch, offer you full control over color space and color component selection.
I've made an app for this entire process
Because entering colors into Xcode is a royal pain, I've written a simple macOS app that can generate color lists and Objective-C files for you. There are a few different apps that can already do this, but none of them take into account truly-flexible color space support like this one does.
Chroma is a color builder, not a color picker
Unlike the color pickers you'll find in design tools, Chroma allows you to build colors, one component at a time, without affecting the other values.
#1E70E7 shown in sRGB, Display P3, and Adobe 1998
#1E70E7 in sRGB shown in a device independent color wheel
#1E70E7 in Display P3 shown in a device independent color wheel
#1E70E7 in Adobe 1998 shown in a device independent color wheel
With Chroma, you can easily understand the differences between color spaces, and you can use the built-in macOS color picker / dropper tool to collect and organize colors from your designs.
Easily use your colors in Xcode (and pretty much everywhere else, too)
Once you've finalized your list of colors, Chroma can make them easily available for you in Xcode, and pretty much any other macOS app as well. Click "generate", and Chroma will create a .clr file, which you can install on your computer or distribute amongst the rest of your team. Chroma also support flexible Objective-C code generation, so you can use your colors programmatically as needed. Code can be generated as a category, where every color object is created once and retained in memory, or as a category for UIColor, where color objects are created every time as needed. Chroma supports UIKit's UIColor, as well as AppKit's NSColor. No matter what color space you specify, Chroma will convert your component values and *always* use the correct factory method. Your colors will always look perfect, no matter what!
Easily generate useful files
Restart Xcode and your colors are instantly available in Interface Builder.
Take a look at some sample files generated by Chroma
Built with long-term use in mind
Chroma was built by an engineer, for use by other engineers. It supports updates via Sparkle (and will be regularly updated), and takes advantage of many modern features of the macOS SDK. Details logs are available using Apple's new logging API in favor of the old ASL system, and the responder chain is designed with NSViewController in mind. I'll be writing a blog post soon about how / why I made this app, along with my conclusions from experimenting with AppKit for the first time. If you've got some cool ideas for how I can make Chroma better, or if you run into any issues, shoot me an email at talkto@vsanthanam.com and let me know! Xcode 9 will support colors in Asset Catalogues, so I'll be working on ways to support this new feature out of the box.

Download Chroma, available for macOS 10.12.x+
UPDATE 02/28/18: macOS 10.13 & Xcode 9.x
Apple has made some serious changes in the latest release of macOS that make Chroma practically unusable on High Sierra in its current form. Additionally, Xcode 9.x features much better color support, including a Chroma-style "color builder" directly in Asset Catalogues, and the correctly selected default color space in IB. As such, the need for a tool like Chroma has been greatly diminished. I will do one more commercial release that will bring things like Swift support, *real* High Sierra compatibility and a few other extras, but after that this project will likely live on GitHub. I hope I was able to help a few frustrated Xcode 8 users. Happy Coding!
- Varun